
In Somerville, a lot of bathroom remodel conversations start with tile, vanity width, and whether the shower glass should be frameless. Then we open the floor and get to the part that determines how the room will perform for years: the toilet drain.
If you're asking what size drain for a toilet, you're asking the right question at the right time. In Greater Boston, especially in older homes in Cambridge, Arlington, and Brookline, the drain size isn't just a plumbing detail. It affects flushing performance, clog resistance, fixture selection, permit approvals, and how much floor work may be needed during the remodel.
Table of Contents
- The Most Important Plumbing Decision in Your Bathroom Remodel
- The Anatomy of a Toilet Drain System
- The Great Debate 3-Inch vs. 4-Inch Toilet Drains
- What the Massachusetts Plumbing Code Says About Toilet Drains
- Installation Realities in Greater Boston's Older Homes
- Common Mistakes to Avoid with Your Toilet Plumbing
- Frequently Asked Questions About Bathroom Plumbing in MA
The Most Important Plumbing Decision in Your Bathroom Remodel
In Somerville MA, many homeowners start a bathroom renovation assuming the toilet just drops onto whatever pipe is already there. That's where problems begin. A toilet can look perfectly installed and still perform poorly if the drain below it is undersized for the fixture, laid out badly, or mismatched to the room's new layout.
For most homes in North America, the toilet waste pipe is 3 to 4 inches in diameter, with 3 inches as the minimum legal baseline for a water closet under widely adopted plumbing standards, including the example cited in the North American toilet drain pipe diameter overview. In practice, that means homeowners are usually deciding between a standard 3-inch drain and an upgraded 4-inch drain.
That choice matters more in a remodel than people think. Once the subfloor is patched, finished flooring is in, and the toilet is set, changing the drain size later is expensive and disruptive.
What usually works and what usually doesn't
- 3-inch drains work well for many standard toilet replacements where the existing layout is sound and the rest of the drainage system is in good shape.
- 4-inch drains make sense when you're building new, reworking the bathroom layout, installing a premium toilet, or trying to reduce the chance of chronic clogging.
- Guessing based on the old setup doesn't work. Older plumbing in Cambridge and Somerville often reflects what fit the framing decades ago, not what's ideal today.
Practical rule: Pick the drain size while the bathroom is still on paper, not after demolition starts.
If you're also thinking about layout and comfort in a small first-floor bath, this London homeowner's renovation guide is a useful outside reference for how fixture planning affects tight spaces.
The Anatomy of a Toilet Drain System
A toilet flushes through a chain of parts under the floor, and the system only works well when those parts are sized and laid out to work together. In Greater Boston remodels, that matters even more because older houses often have patched-in drains, odd framing, and vent lines that were acceptable decades ago but create problems with newer fixtures.
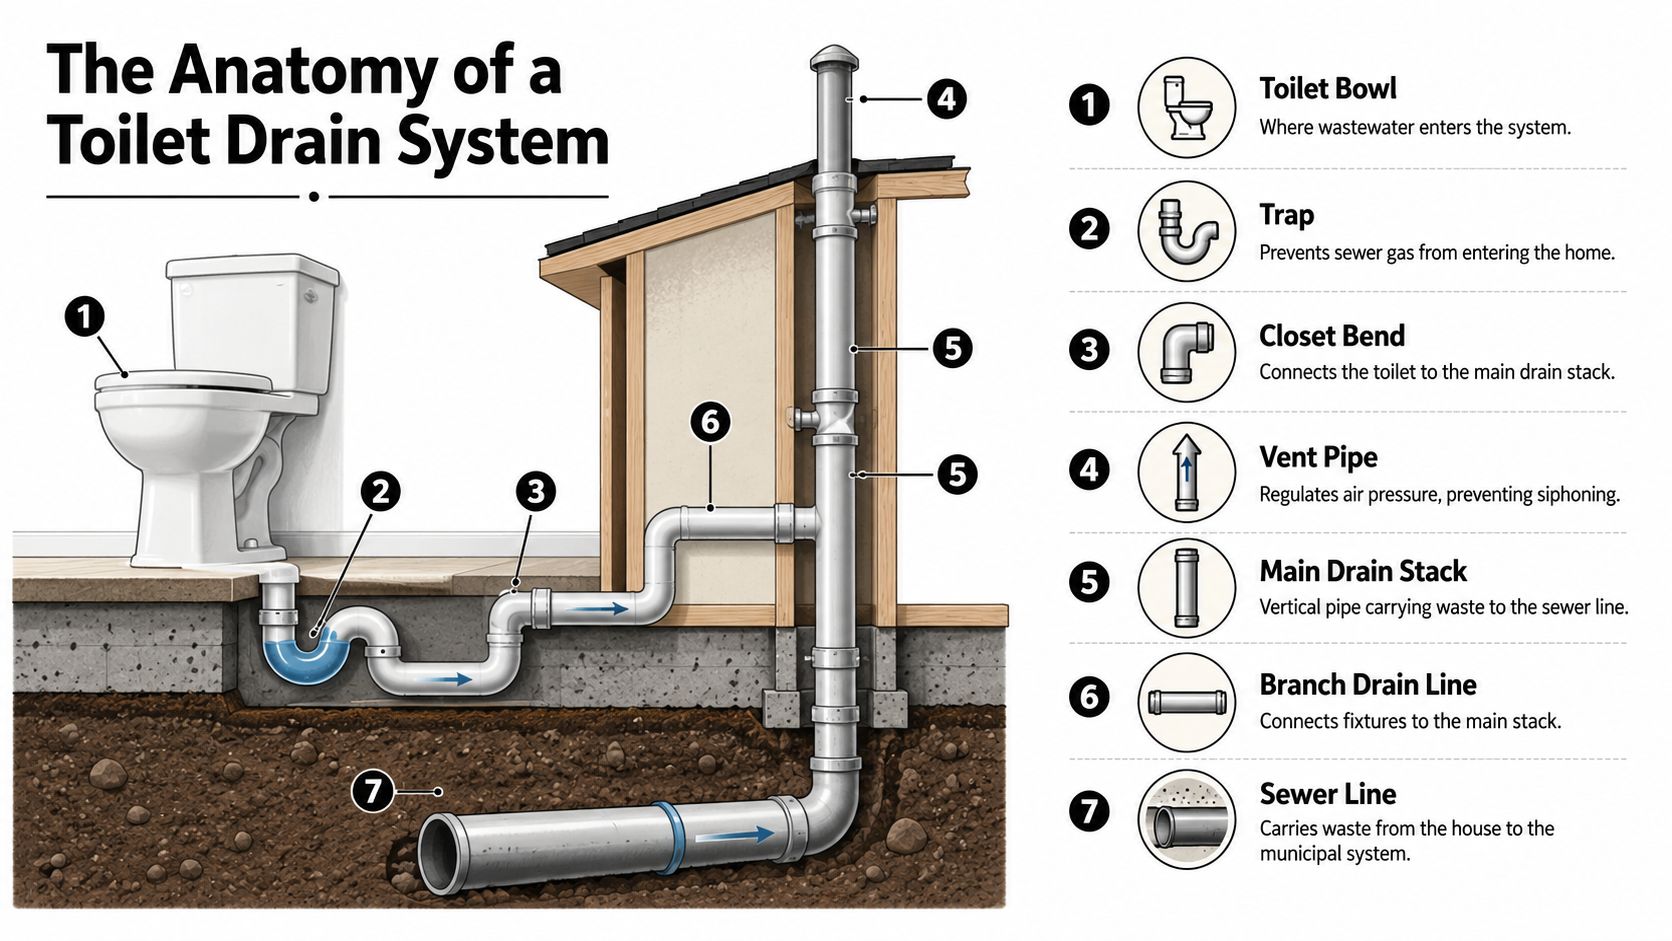
The toilet bowl sends waste into the flange and closet bend. From there, the branch drain carries it to the stack, and the vent keeps air in the system so the flush can move cleanly instead of fighting suction.
The parts that matter under the floor
Here are the pieces that usually determine whether a toilet performs well or turns into a callback.
| Component | What it does |
|---|---|
| Toilet flange | Anchors the toilet to the floor and connects the bowl outlet to the drain pipe |
| Trap | Holds water to block sewer gas from entering the room |
| Closet bend | The curved fitting that changes direction below the toilet |
| Branch drain line | Carries waste from the toilet toward the main stack |
| Main drain stack | Vertical drain path tying fixtures into the home's waste system |
| Sewer line | Takes waste out to the municipal connection |
In a Cambridge triple-decker or a Somerville bathroom gut, the trouble spot is rarely just the toilet itself. More often it is an old cast iron bend with rough interior walls, a flange set too low after new tile, or a branch line forced through joists with awkward offsets. Any one of those can turn a decent toilet into a slow, noisy one.
Why the vent matters as much as the drain
A toilet needs air behind the discharge. Without proper venting, the flush can lose speed, the bowl can gurgle, and nearby traps can siphon.
Massachusetts remodel work has to be looked at as a system, not a single pipe size decision. The drain line, vent path, flange height, fitting layout, and framing route all affect performance. That is one reason I always review the full bathroom group before signing off on a toilet rough-in, especially in older homes where a new high-performance toilet gets tied into older piping. Homeowners planning a broader remodel should also review bathroom plumbing vent size requirements so the toilet, shower, and sink all work together.
A toilet that drains slowly or bubbles after flushing often has a venting issue, a layout issue, or both.
The Great Debate 3-Inch vs. 4-Inch Toilet Drains
Most homeowners want a clear answer. Here it is. A 3-inch drain is the accepted minimum. A 4-inch drain is often the better performance choice when the framing and budget allow it.
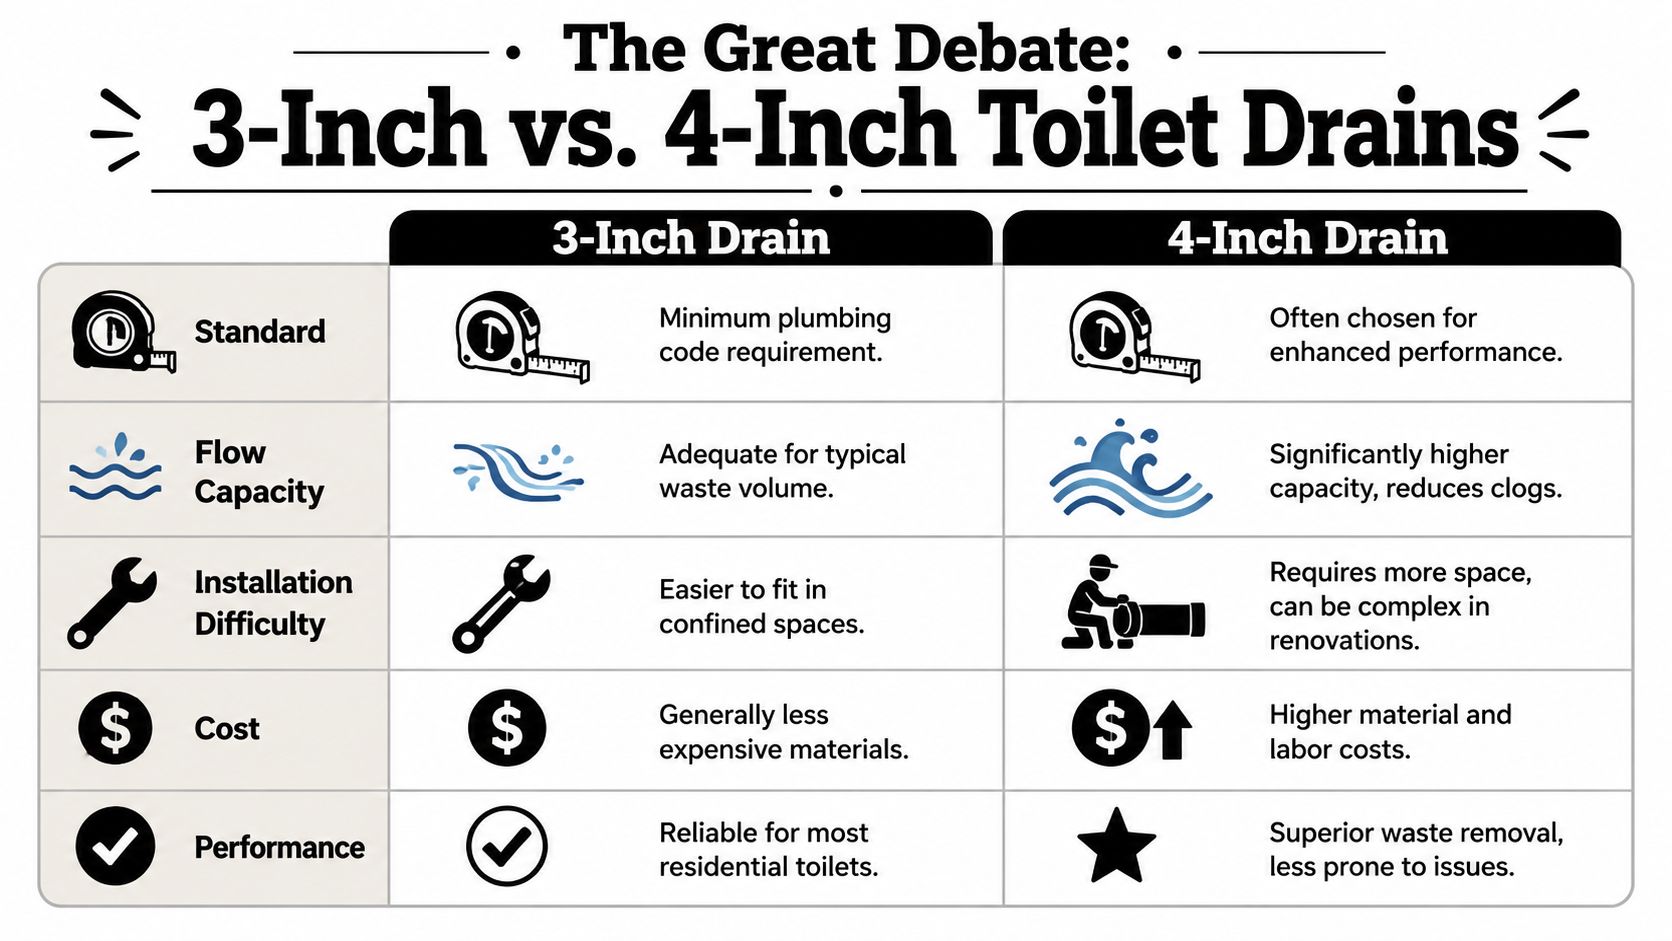
The question isn't whether 3-inch is “legal enough.” The important question is whether it makes sense for the fixture and layout you're building.
Where 3-inch still works well
A standard 3-inch toilet drain is still a solid choice in many remodels:
- Simple toilet replacement where the existing line is already in good condition
- Tight framing conditions where enlarging the drain path would mean more structural work
- Older homes with limited access from below, especially when you're trying to avoid opening finished ceilings
- Straightforward bathroom renovation Arlington MA projects where the fixture package is conventional and the stack location is fixed
In those cases, a 3-inch line can perform perfectly well if the slope, venting, flange, and tie-in are all done correctly.
When 4-inch is the better choice
The argument for 4-inch gets stronger in new work and premium remodels. According to this industry discussion of North American drain standards, while 3 inches remains the minimum code requirement, new residential construction increasingly uses 4-inch pipes due to their superior flow efficiency, especially for flush volumes exceeding 1.6 gallons and smart toilet systems. Industry proposals now explicitly recommend 4-inch drains for wall-mounted or smart-covered toilets to ensure future compatibility.
That lines up with what we see in the field. If a homeowner in Newton or Lexington is installing a wall-hung carrier system, a high-end integrated bidet toilet, or a bathroom addition intended to stay current for a long time, a 4-inch line is often the smarter choice.
Here's a practical comparison:
| Decision factor | 3-inch drain | 4-inch drain |
|---|---|---|
| Code acceptance | Meets minimum standard in typical toilet applications | Exceeds the minimum |
| Fit in remodels | Easier in tight floor systems | Harder in confined framing |
| Future fixture flexibility | More limited | Better for upgrades |
| Clog resistance | Good when installed well | Better margin for error |
This video gives a useful visual overview of the sizing discussion and installation considerations.
If we're already opening the floor for a full bath remodel, we'd rather make the drain decision once and make it for the long term.
What the Massachusetts Plumbing Code Says About Toilet Drains
In Massachusetts, the code conversation matters because bathroom work often triggers permits, inspections, and coordination between building, plumbing, and sometimes structural review. Homeowners in Cambridge, Belmont, and Medford are often surprised that even a “simple” toilet relocation can involve more than a fixture swap.
Code minimum versus practical recommendation
Under the broader North American plumbing standard summarized in the earlier-cited reference, a toilet waste pipe is typically 3 to 4 inches, with 3 inches serving as the minimum drainage size for a water closet under code language used as a legal baseline in new installations. That minimum matters, but minimum isn't the same thing as best practice.
In Massachusetts, we work within the MA State Building Code and the local inspection process under 780 CMR where structural and finish work intersects with permitted remodeling. For the plumbing side, the inspector is looking for a compliant installation. We're looking for a bathroom that still works well years later.
That's why we often recommend going beyond the minimum when the layout includes long horizontal runs, difficult tie-ins, or premium toilet fixtures. A system can pass inspection and still be less forgiving than it should be.
Permits and inspections in Massachusetts
Most toilet replacements in the same exact location are straightforward. A bathroom remodel that changes drain location, venting, framing, or fixture layout usually needs permits and inspection coordination.
Typical review points include:
- Building permit when walls, floors, or framing are opened and rebuilt
- Plumbing permit when the toilet drain, flange location, or venting changes
- Electrical permit when the remodel adds lighting, outlets, heated floors, or smart toilet power
- Rough inspections before finishes close the work
- Final inspections before the project is signed off
If the bathroom includes a shower rework too, homeowners often benefit from reviewing how drain sizing compares across fixtures in this guide on what size drain pipe for shower.
Installation Realities in Greater Boston's Older Homes
You buy a condo in Somerville, pull the old toilet during a remodel, and find cast iron, patched subfloor, and a joist sitting right where the new drain should go. That is a normal Boston-area bathroom renovation.
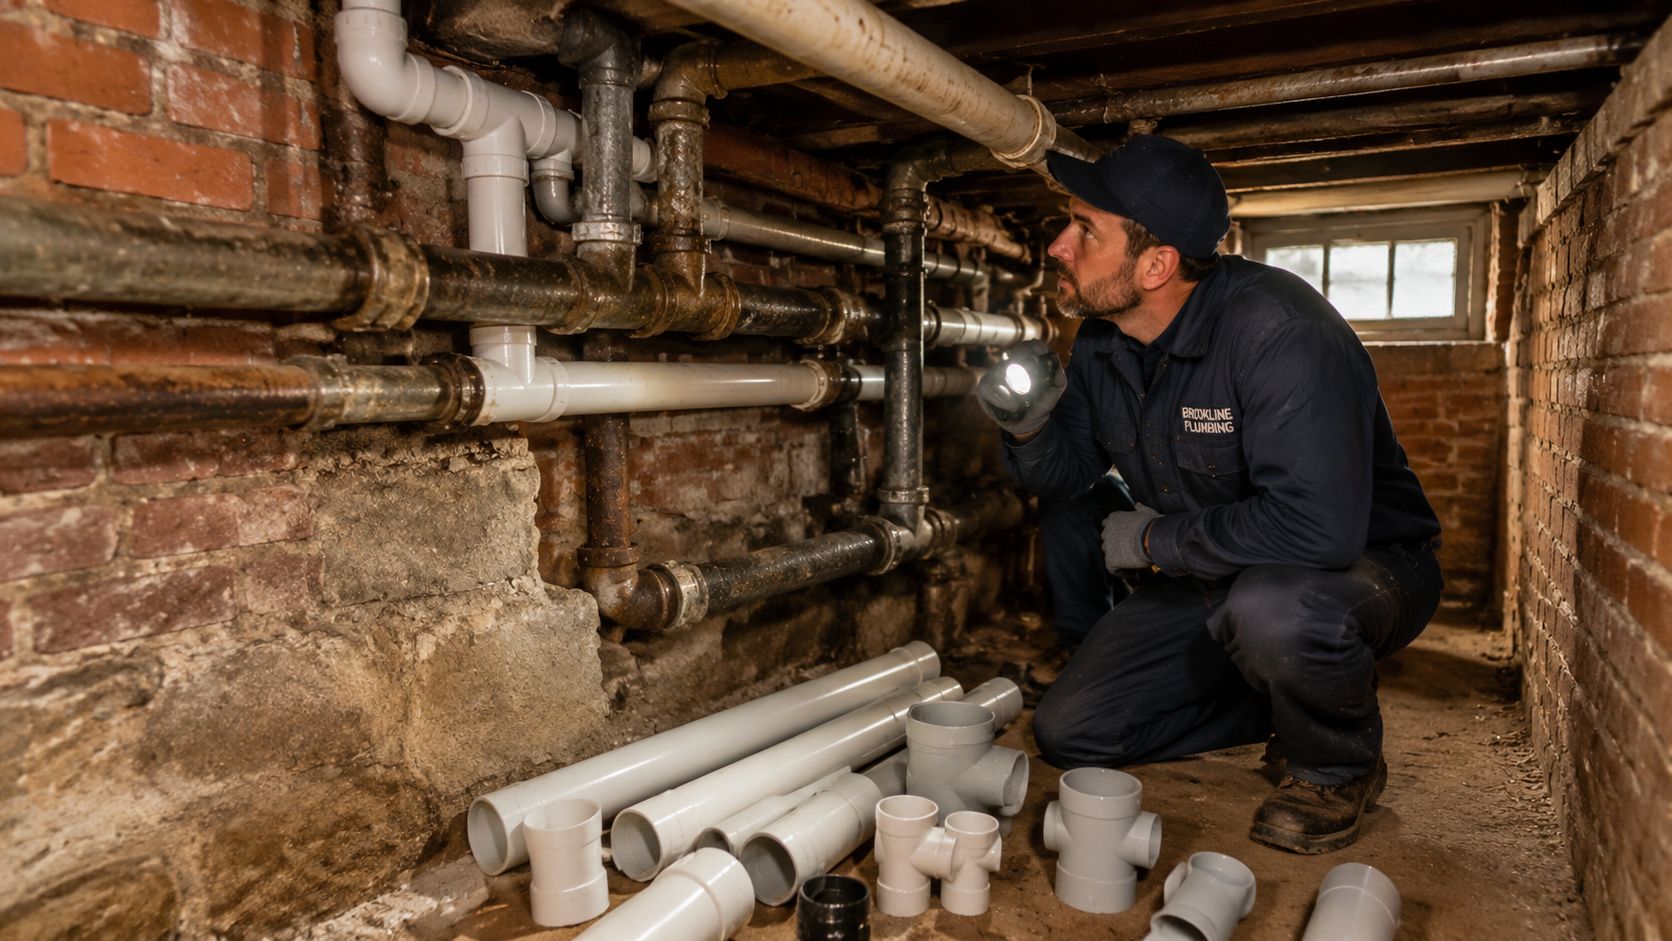
Older homes around Cambridge, Brookline, and Medford rarely give you an open floor cavity and a straight pipe run. They give you tight framing, old rough-ins, and drain lines installed for fixtures that were smaller, heavier, and less efficient than the toilets sold today. That matters when choosing between a 3-inch and 4-inch drain. The pipe size affects how much floor gets opened, what fittings fit below the flange, and whether the work stays practical without major reframing.
Rough-in location is often the first constraint. In newer construction, the standard 12-inch rough-in usually leaves you with plenty of toilet choices. In older Boston housing stock, a 10-inch rough-in still shows up regularly. That can limit fixture selection before the plumber even touches the drain.
What usually complicates the work
In older Somerville triple-deckers and Cambridge Victorians, we regularly run into the same problems:
- A 10-inch rough-in that narrows the list of toilets that will fit
- Joists or bridging in the wrong place for a clean closet bend connection
- Shallow framing bays that make a 4-inch line harder to route without more floor work
- Old cast iron branches that need careful transitions to PVC
- Existing layouts built around older toilet performance, not newer high-efficiency models
This is the practical trade-off homeowners need to understand. A 4-inch drain can make sense in the right layout, especially on a longer run or where the branch line serves more than one fixture group. But in many older homes, keeping a properly installed 3-inch toilet drain is the smarter call because it avoids unnecessary structural work and still performs well with modern toilets. Massachusetts code sets the baseline. The house decides how expensive the upgrade becomes.
Why 3-inch often wins in older Boston bathrooms
A lot of people assume bigger pipe is automatically better. On paper, that sounds reasonable. In the field, I have seen 4-inch upsizing create more disruption than benefit in older bathrooms where the existing system was built tightly around a 3-inch route.
Here is how the work usually compares:
| Scope | What it usually involves |
|---|---|
| Keep existing 3-inch drain and location | New flange, spot repairs, updated fittings, toilet reset, less framing disturbance |
| Move the toilet or upsize to 4-inch | Larger floor opening, revised closet bend, joist review, vent coordination, more patching and finish repair |
That difference shows up fast once the floor is open. If the bathroom sits over finished space, every extra cut affects framing, plaster, tile, and scheduling. In Cambridge and Brookline, where older framing is rarely generous, that labor adds up quickly.
Modern toilet design is part of the equation too. Many current gravity and pressure-assisted toilets are engineered to perform well on a 3-inch line when the slope, venting, and flange height are correct. In contrast, a bad transition from cast iron to PVC or a poorly aligned bend will cause more trouble than sticking with 3-inch ever would. If you are comparing the full bathroom drainage layout, it also helps to review how to measure tub drain size before a remodel.
Special cases we see in Massachusetts remodels
There are bathrooms where a standard gravity toilet is not the best fit. Basement half baths, rear additions, and below-grade remodels sometimes call for a pumped system or a macerating unit because the main drain elevation does not work for a conventional tie-in. Those jobs need careful planning, and homeowners looking at that option should read these macerator toilet installation tips.
In older homes, the least expensive drain choice during demolition can become the costly one if it creates recurring clogs, floor repairs, or a toilet that never flushes right.
If the remodel extends beyond the toilet area, the location of the vanity, tub, or shower often drives the plumbing plan as much as the toilet does. That is why we treat drain sizing as part of the room layout, especially on projects tied to bathroom remodeling somerville or bathroom remodeling medford.
Common Mistakes to Avoid with Your Toilet Plumbing
Drain size is only part of the answer. We see plenty of toilets tied into the “right” pipe size that still perform badly because the installation details were sloppy.
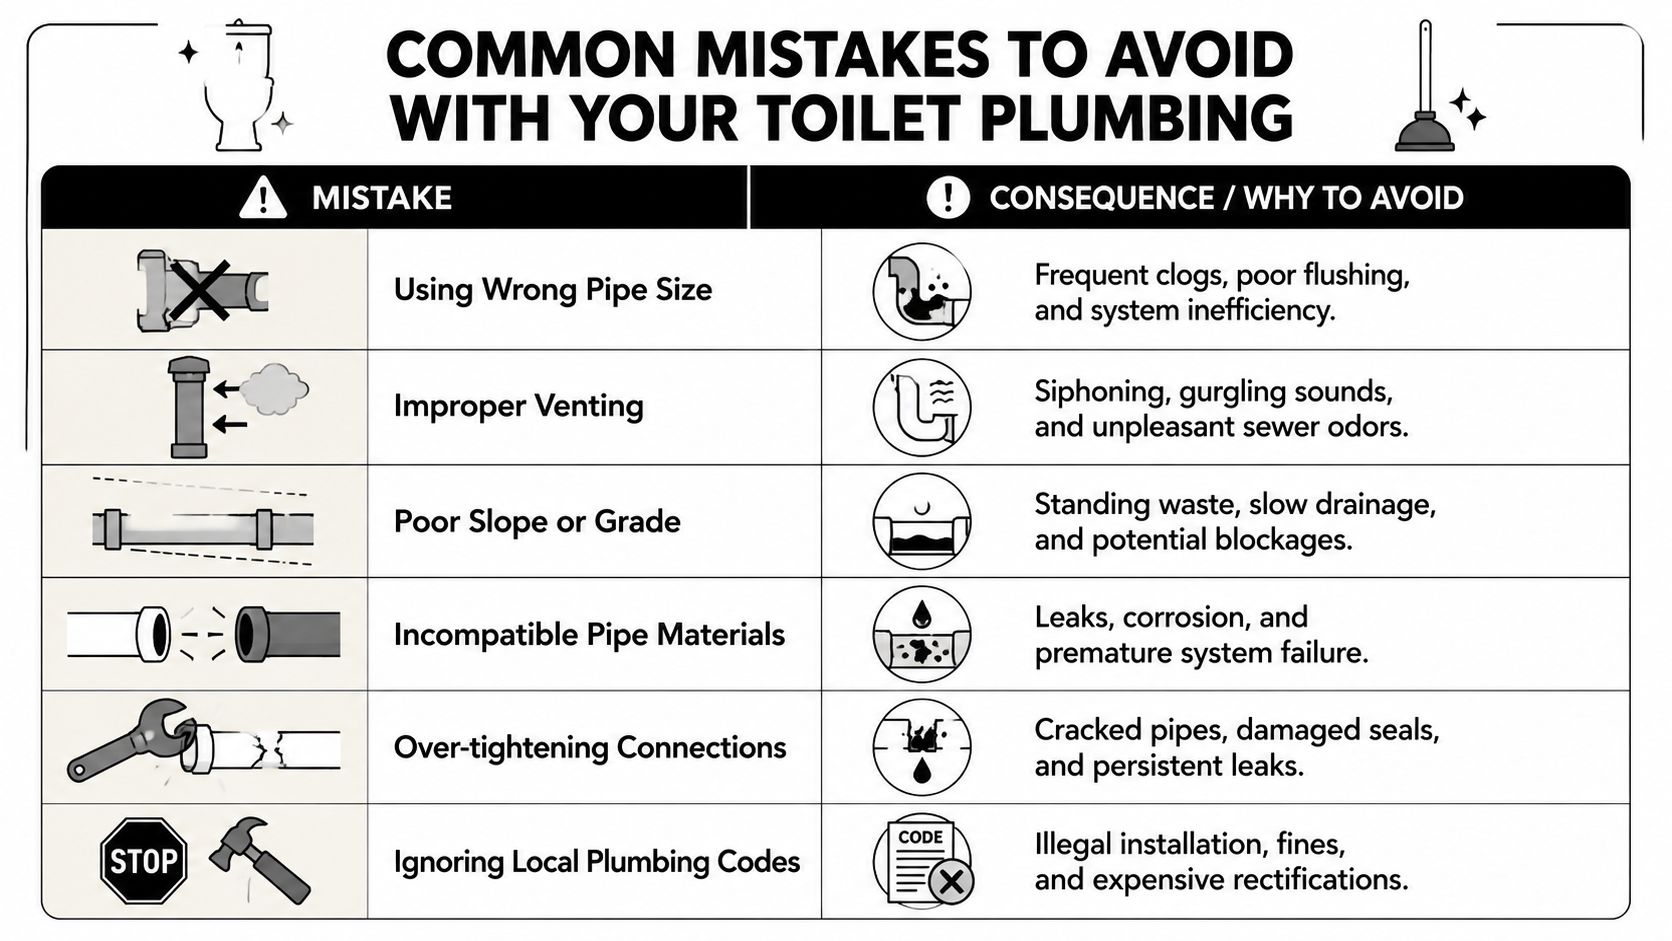
The errors we see most often
- Bad slope on the horizontal run. Too flat and waste hangs up. Too steep and liquids can outrun solids. Both setups create service calls nobody wants.
- Improper venting. This causes gurgling, weak flush behavior, trap issues, and sewer odors.
- Loose or wrong flange setup. If the flange isn't anchored correctly at the finished floor height, the toilet can rock and break the seal.
- Poor material transitions. This is common in older homes where newer PVC or ABS work ties into existing cast iron.
- Ignoring local code review. A drain change that isn't permitted can turn into a much bigger correction later.
A lot of homeowners also focus only on the toilet and forget the surrounding fixtures. If you're reworking the whole bathroom layout, this guide on how to measure tub drain size helps avoid similar mistakes on the tub side.
A toilet should sit solid, flush cleanly, and stay quiet. If any one of those is off, we start looking below the bowl.
Where specialty toilets can complicate the plan
Not every bathroom uses a standard floor-mounted toilet tied to a conventional gravity drain. Basement bathrooms, half baths under stairs, and certain retrofit layouts sometimes involve macerating systems. Those can be useful in the right application, but they need a different planning approach. If you're comparing options, these macerator toilet installation tips are a helpful outside reference for understanding where those systems fit and where they don't.
For standard remodels, though, the biggest mistakes still come down to basics: wrong drain choice, poor venting, and rough-in errors that weren't addressed before finish work started.
Frequently Asked Questions About Bathroom Plumbing in MA
In Greater Boston remodels, these are the questions that come up once the floor is open and the old plumbing is finally visible. The answers depend less on theory and more on what is under the bathroom in that specific house, especially in older places in Cambridge, Somerville, and similar towns where cast iron, tight framing, and past patchwork repairs are common.
Do I need a permit to replace or move a toilet in Massachusetts
For a straight toilet swap in the same spot, the job is usually simple. Once the work changes the drain location, venting, or the floor and wall framing around it, permit review is usually part of the process in Massachusetts. In practice, that means the homeowner should expect plumbing sign-off and, in many towns, coordination with the building department if the remodel touches more than the fixture itself.
That matters because a toilet move is rarely just a toilet move. In older Boston-area homes, shifting the flange often affects joists, finish floor height, and the way the branch line ties back into the existing system.
How long does the toilet rough plumbing phase usually take
On a clean remodel where the drain stays put, rough plumbing moves quickly. The schedule gets longer when we have to open more floor, work around old framing, or wait on inspections before the room can be closed back up.
In a Somerville or Cambridge bathroom, the hidden conditions usually control the timing. Cast iron that looks serviceable from above may need more work once exposed. A simple rough-in can turn into a few extra steps if the line needs to be replaced, the flange height has to be corrected for new tile, or the existing layout does not meet current code expectations.
Can we stay in the house during the work
Usually yes, if there is another working bathroom.
If the house has only one full bath, the decision needs to be made before demolition starts. Homeowners who plan ahead handle this phase much better than those trying to figure it out after the toilet is already disconnected. On larger remodels, we talk through that logistics piece early because the plumbing work itself may be straightforward, but living through it without a backup bathroom is the harder part.
Is a 4-inch drain worth it in a remodel
We get this question a lot on site, especially when a homeowner is installing a higher-end toilet and assumes bigger pipe automatically means better performance. In many Massachusetts remodels, a 3-inch drain is still the right answer because that is what the code commonly allows for a standard residential toilet and what the framing can accept without unnecessary structural work.
A 4-inch drain can make sense if the layout is already being rebuilt, the existing line is undersized for the broader system, or the house has ongoing drain performance issues that justify a larger branch or building drain strategy. But for one bathroom in an older home, forcing in 4-inch pipe can create more work than value. The pertinent question is whether the full system, toilet design, slope, venting, and framing all support that change. Modern toilets flush far better than older models did, so a properly installed 3-inch line is often more than enough.
How do change orders happen on older Boston-area homes
They usually start after demolition, when the finished surfaces are gone and the actual condition of the plumbing is finally exposed. We see old cast iron with thin walls, off-center rough-ins from past renovations, and repairs that were done years ago without much regard for present-day code.
That is common in older housing stock around Greater Boston. A homeowner may budget for a toilet replacement and basic drain work, then find out the branch line pitch is off or the connection back to the stack needs to be redone. Good planning cuts down surprises, but it does not eliminate them in a hundred-year-old house. The best approach is to leave room in the budget and schedule for corrections that only become visible once the floor is open.