
In Cambridge, a homeowner with an unfinished basement often starts with a simple idea, perhaps a playroom, home office, or guest area. The budget becomes less simple when an older stone foundation, occasional dampness, low ceiling projections, shared utilities, or a future bedroom enters the discussion. Basement finishing on a budget works when the use, moisture plan, and Massachusetts code requirements are settled before anyone selects flooring or paint.
We approach these projects as a Massachusetts licensed general contractor serving Greater Boston. Our team works with homeowners in Belmont, Brighton, Brookline, Burlington, Cambridge, Lexington, Medford, Melrose, Newburyport, Newton, Reading, Somerville, Stoneham, Wakefield, and Wellesley, coordinating design, permits, inspections, and construction around a written scope. The goal isn't to make every basement luxurious. It's to create a safe, comfortable space without paying to remove work that was installed too early.
Table of Contents
- Planning Basement Finishing on a Budget in Cambridge MA
- Assess the Space and Set a Realistic Budget
- Control Moisture Before Adding Walls or Finishes
- Choose Materials That Balance Cost and Performance
- Navigate Massachusetts Basement Permits and Code
- Decide Which Work to DIY and What to Hire Out
- Finish Strong with Smart Design and Contractor Support
Planning Basement Finishing on a Budget in Cambridge MA
A homeowner in Mid-Cambridge may have an older two-family house with an unfinished basement, a stone foundation, occasional dampness, and just enough room for a family rec area and a desk. If the household is trying to hold the project near a $25,000 ceiling, the first conversation shouldn't be about cabinetry, wall color, or a bathroom. It should be about what the basement will and won't become.
We'd start by limiting the use. A rec room, office, or flexible guest area has a different cost and code profile from a full apartment. A separate dwelling or ADU can involve zoning review, additional plumbing and electrical work, fire separation, and more demanding layouts. Treating a modest finish as a future apartment often creates a scope that no longer fits the original budget.
Three decisions before finishes
The first decision is purpose. Keep the initial phase focused on usable space, storage, lighting, flooring, and durable walls. If a bathroom or sleeping room matters later, reserve the necessary locations and confirm the feasibility before closing the walls, but don't automatically build every expensive feature in phase one.
The second decision is moisture and radon. Old fieldstone walls can transmit dampness differently from newer poured concrete, and a basement that looks dry during one visit may still have seasonal moisture movement. Radon also deserves testing because the World Health Organization's radon guidance notes that levels are usually higher in basements and ground-contact spaces. We don't frame around an unresolved water source or assume a finished wall will solve a foundation problem.
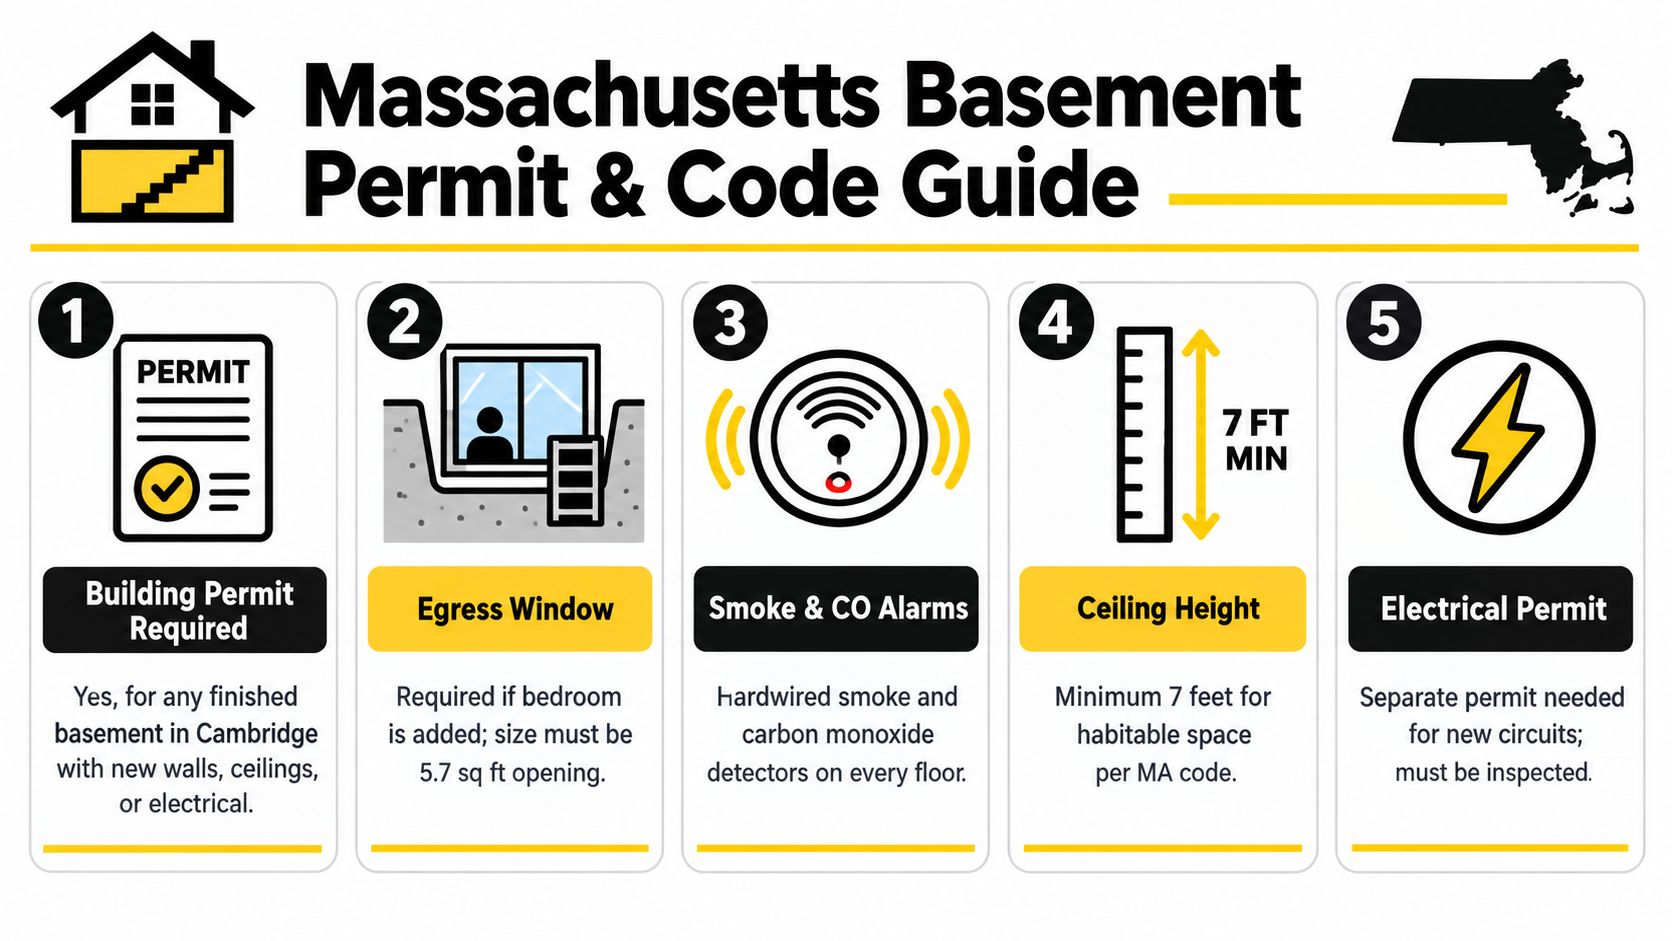
The third decision is code feasibility. Massachusetts building code generally requires 7 feet of minimum ceiling height for habitable basement space, measured from the finished floor to the lowest ceiling projection. Certain nonhabitable basement areas may be permitted at 6 feet 8 inches, with limited projections reaching 6 feet 4 inches, as described in 780 CMR Massachusetts building code provisions.
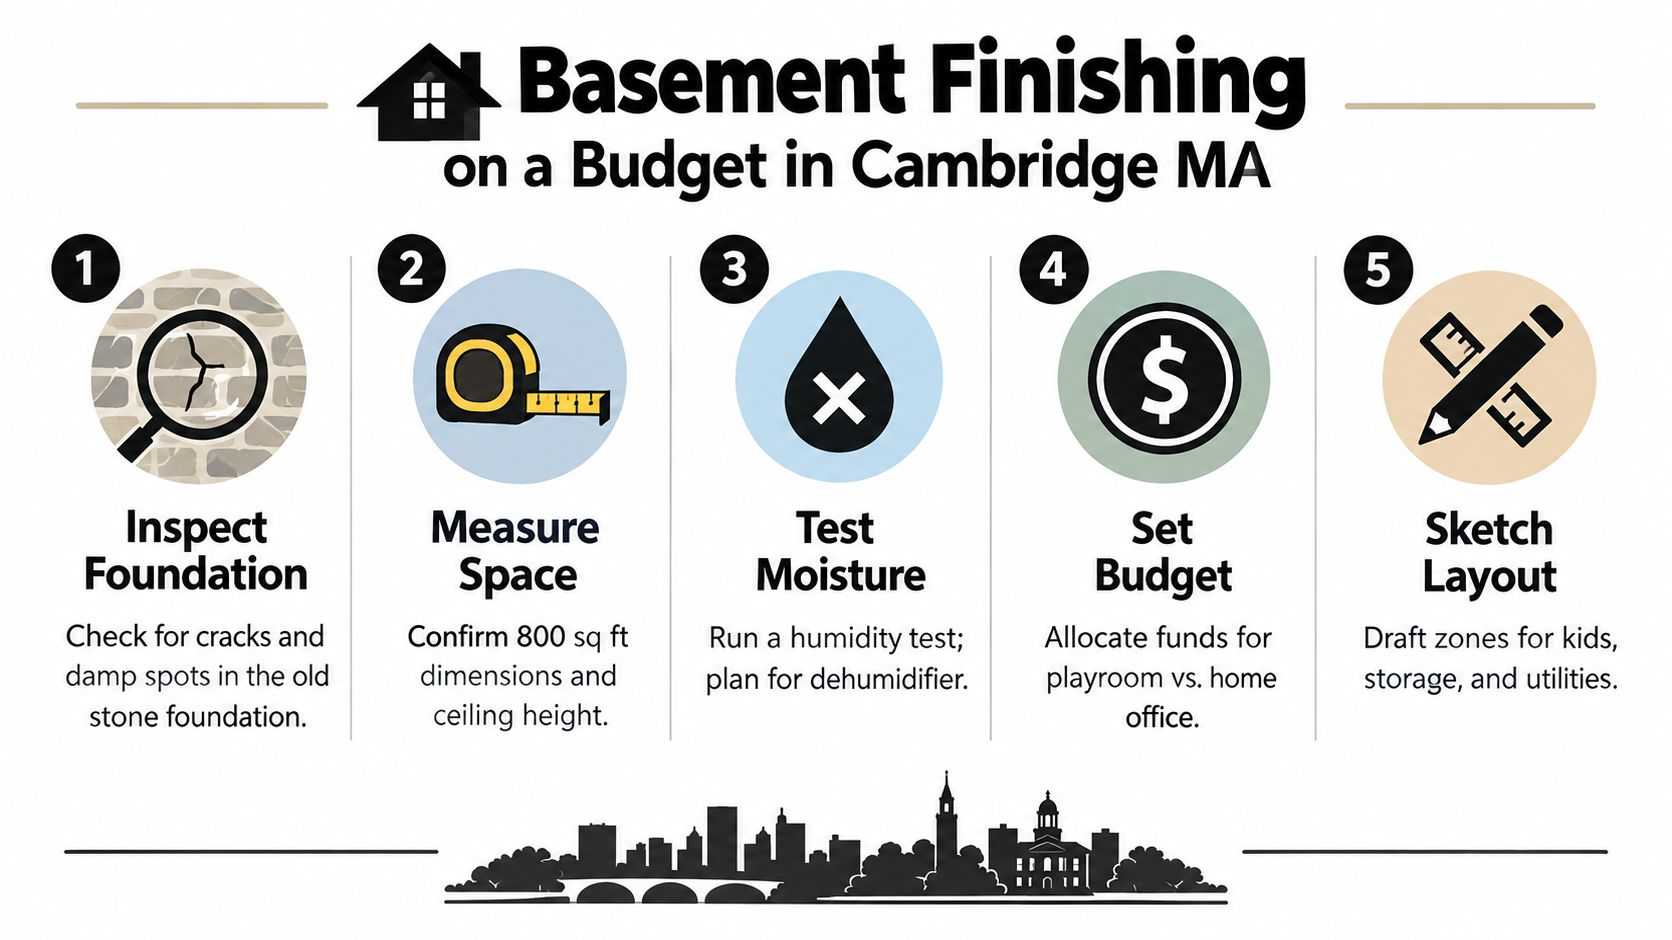
Greater Boston housing stock changes the cost equation. Stone foundations, low lintels, tight stairways, shared sewer connections, and utilities that cross the proposed room can require more careful layout work than a newer suburban basement. A controlled scope is still realistic, but only after those existing conditions are measured and documented.
Practical rule: Spend first on the conditions that protect the finished room. Cosmetic upgrades come after moisture, height, egress, and utilities are understood.
Assess the Space and Set a Realistic Budget
Before we price a basement, we walk the space as a construction site, not as an empty room. Measure from the slab to the underside of joists, then measure again beneath beams, ducts, and other low projections. Massachusetts code uses the finished floor and ceiling, so a space that appears tall before insulation, flooring, and ceiling work may not remain compliant afterward.
Record every window opening, its location, and its relationship to the proposed room layout. If the plan includes a sleeping room, Massachusetts requirements include an emergency escape and rescue opening with a 5.7-square-foot minimum net clear opening, a 24-inch minimum opening height, a 20-inch minimum opening width, and a sill no more than 44 inches above the finished floor, according to this Massachusetts basement egress requirement guide.
A useful pre-pricing walk-through
Use a tape measure, flashlight, camera, and moisture meter if available. Photograph cracks, white efflorescence, sump locations, exposed pipes, the electrical panel, stair geometry, and every place where a duct or utility enters the room. Keep required electrical-panel working clearance open in the layout rather than discovering the conflict after framing.
For a simple screening check, tape a 2-foot square of plastic to both the slab and a wall for 48 hours, then inspect for condensation. This isn't a substitute for professional testing, but it can reveal that the space needs further evaluation before finishes are selected.
Split the budget into two groups:
- Fixed scope: permits, moisture mitigation, egress work, insulation, required electrical changes, plumbing relocation, and protection of mechanical equipment.
- Flexible scope: flooring style, trim profile, paint, built-ins, ceiling treatment, decorative lighting, and specialty doors.
- Holdback: keep part of the budget available for concealed conditions rather than spending the full amount on visible finishes.
Aureli Construction's basement remodeling cost guide can help frame the early conversation, but no per-square-foot figure replaces a site review. For Greater Boston planning, we commonly separate a basic finish at roughly $20 to $35 per square foot from a more complete, code-compliant midrange build at about $40 to $65 per square foot. These are planning ranges, not promises, and moisture repairs, bathrooms, egress upgrades, permits, and premium materials can move the total substantially.
Basement Finishing Cost Tiers in Greater Boston
| Tier | Cost per Sq Ft | Typical Scope Included |
|---|---|---|
| Basic finish | $20 to $35 | Controlled layout, insulation, finished walls, basic lighting, practical flooring, limited trim |
| Code-compliant midrange | $40 to $65 | More complete framing and insulation, upgraded lighting, improved flooring, permitted electrical work, possible egress work |
| Expanded build-out | Qualitative | Bathroom, bedroom, extensive plumbing, moisture remediation, mechanical changes, and upgraded finishes |
The key decision is not whether a low number sounds attractive. It's whether the proposed scope includes the work that keeps the basement dry, accessible, insurable, and usable.
Control Moisture Before Adding Walls or Finishes
A dry-looking basement can still hold enough moisture to damage new walls. Before approving flooring, paint, or framing, trace how water reaches the space and correct that path. Otherwise, a modest finish can become a tear-out involving insulation, drywall, flooring, and electrical work.
Start outside. Downspouts should discharge at least 6 feet from the foundation, and the ground should direct runoff away from the house. Window wells need a clear drainage path rather than collecting water against the foundation wall. These corrections are often less disruptive than opening finished walls later.
Inside, separate surface condensation from water under pressure. Standing water, recurring seepage, or damp foundation joints may call for an interior drainage channel, French drain, sump pump, and sealed sump lid. Exterior excavation can be appropriate when footing drainage has failed, but it is not automatically the least expensive remedy. The right repair depends on the entry point, foundation construction, and whether the problem is isolated or recurring. A basement moisture control service can help identify that distinction before the finish conceals it.
The sequence we follow
- Inspect and dry the space. Look for cracks, seepage, efflorescence, plumbing leaks, and slab moisture. Do not enclose the basement until the conditions are understood.
- Correct drainage conditions. Address roof runoff, grading, window wells, sump operation, and every active water path.
- Test for radon. Ground-contact rooms deserve attention, as discussed in the earlier planning phase. A passive sub-slab depressurization rough-in is easier to plan before finished flooring and walls are installed.
- Choose the wall assembly. Closed-cell spray foam or rigid foam board may suit some foundations and budgets. Framed walls need a continuous vapor-control strategy that matches the approved assembly and Massachusetts energy requirements.
- Verify conditions before framing. Concrete must be dry enough for the selected assembly, with seams and penetrations sealed continuously.
The vapor-control decision should follow the wall assembly, not a package of isolated product specifications. The basement vapor barrier guide identifies low-perm Class I vapor retarders with a perm rating of 0.1 or less as a benchmark. For planning, material cost may run about $0.10 to $0.50 per square foot, with professional installation adding roughly $1.00 to $3.00 per square foot. Use those figures as a comparison point, then have the installer confirm compatibility with the foundation and insulation system.
The U.S. Department of Energy example for insulating 1,400 square feet of basement wall with 2-inch polyisocyanurate at about R-12 was estimated at roughly $2,100 to $2,600 installed. The practical lesson is to price a code-aligned assembly early rather than fund an expensive wall build-out that ignores moisture. Massachusetts energy rules also address conditioned basement walls, requiring insulation from the top of the basement wall down to 10 feet below grade or the basement floor, whichever is less, as outlined in this Massachusetts residential energy code reference.
Damp materials can support microbial growth, so review guidance on how to prevent mold in basement before selecting wall finishes.
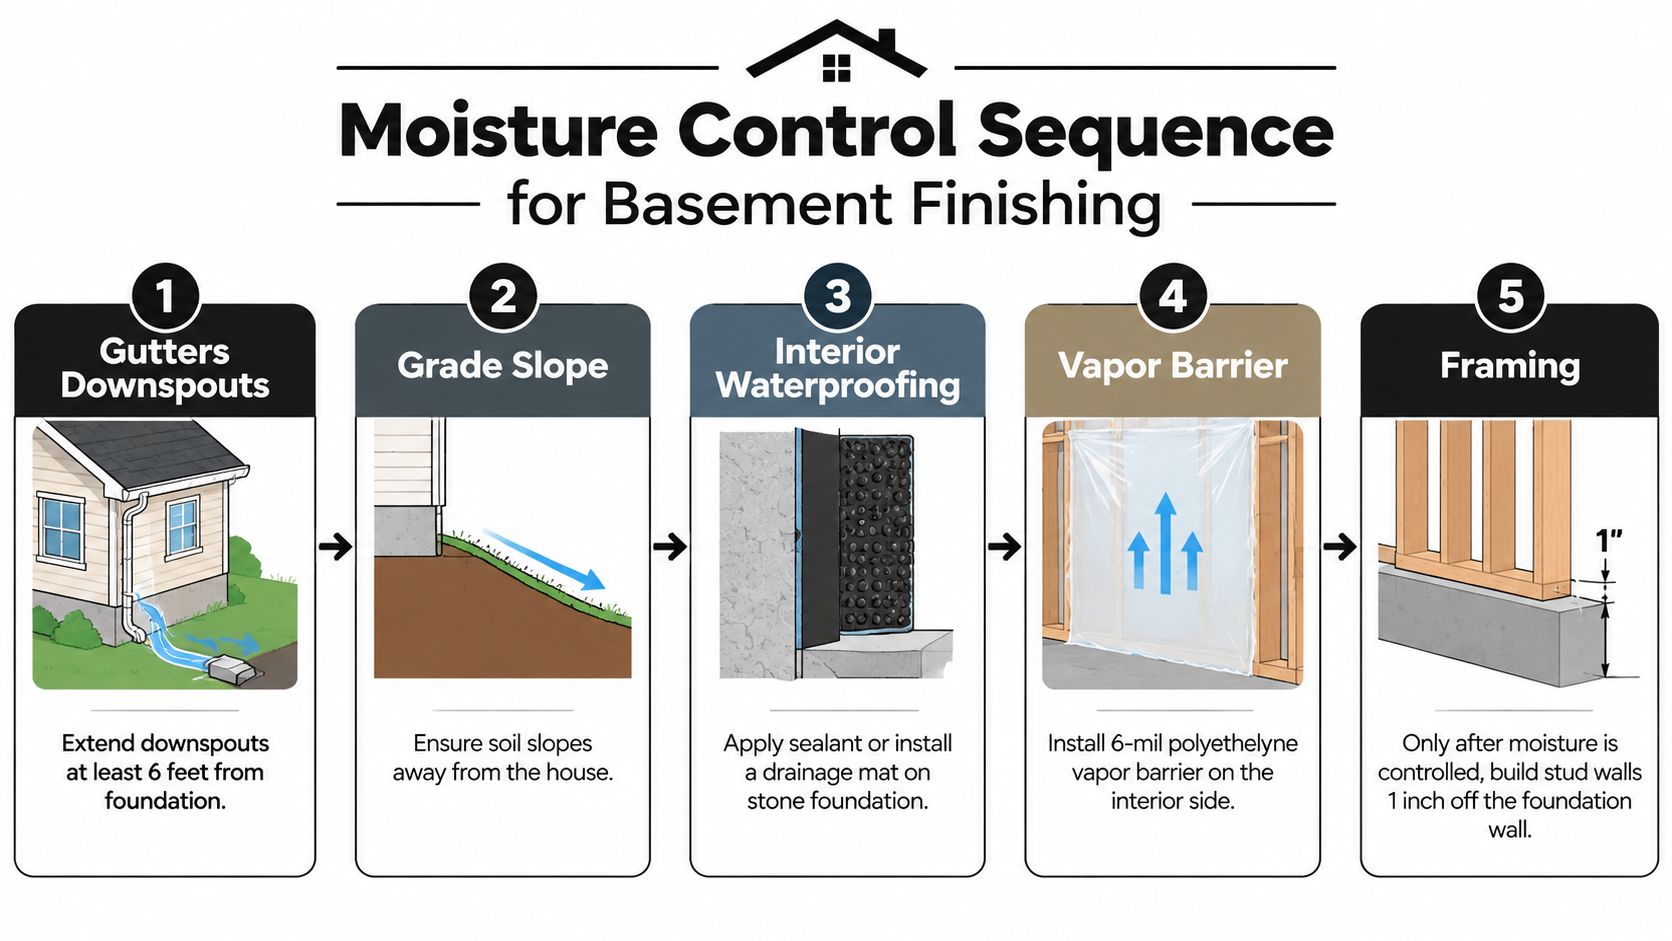
A short visual walkthrough reinforces the order of operations:
Moisture decisions set the location of framing, electrical boxes, HVAC access, and suitable flooring systems. Spending less here usually postpones required work rather than eliminating it. A limited, livable finish is safer when the budget protects drainage, testing, and the wall assembly before visible finishes.
Choose Materials That Balance Cost and Performance
A budget finish doesn't need the cheapest item in every category. It needs a consistent material strategy. Standardizing doors, trim, paint, flooring, and lighting reduces labor complexity, while moisture-sensitive assemblies and egress components should be selected for performance first.
For many Cambridge and Somerville basements, we prefer a practical combination of rigid foam or an approved insulated wall assembly, durable framing, moisture-tolerant drywall where appropriate, an accessible ceiling, and floating luxury vinyl plank over a properly prepared subfloor. A drop ceiling can cost more visually than an exposed ceiling, but it gives future access to plumbing, wiring, and ductwork. That access can prevent unnecessary demolition later.
Where homeowners can save
Use one flooring product throughout the main finished area instead of introducing multiple transitions. Choose a standard trim profile and a readily available paint color. Install recessed LED lighting where the layout supports it, but don't add decorative fixtures that require moving electrical boxes or opening completed walls.
The material budget should protect the subfloor or slab preparation, moisture management, wall insulation, required drywall performance, egress work, and safe electrical installation. It can economize on custom built-ins, specialty tile, elaborate ceiling details, and premium hardware.
| Category | Budget Option | Midrange Option | Premium Option | Recommended For Budget Finish |
|---|---|---|---|---|
| Wall assembly | Rigid foam with straightforward framing | Hybrid insulated assembly | Higher-performance specialty assembly | Use the approved moisture-compatible assembly |
| Wall finish | Standard drywall where suitable | Moisture-resistant drywall in selected areas | Specialty panel system or architectural finish | Avoid absorbent finishes in vulnerable locations |
| Ceiling | Painted exposed utilities where permitted | Drop ceiling | Finished drywall ceiling | Use a drop ceiling when access matters |
| Flooring | Painted slab or basic floating floor | LVP over prepared subfloor | Tile or premium engineered system | LVP is practical for many dry basements |
| Trim | Stock profiles | Better-finished stock trim | Custom millwork | Standardize profiles across the room |
| Lighting | Basic code-compliant fixtures | Recessed LED layout | Layered architectural lighting | Prioritize even, useful light |
| Storage | Open shelving | Stock cabinets | Custom built-ins | Add storage only where it solves a real need |
The right savings are usually quiet. A homeowner may not notice a stock trim profile, but they'll notice a floor that buckles or a wall that must be opened to reach a shutoff.
Navigate Massachusetts Basement Permits and Code
Most basement finishing projects in Cambridge and surrounding Massachusetts communities need a building permit when they add walls, ceilings, finished rooms, structural work, or new electrical and plumbing systems. Electrical and plumbing work may require separate trade permits and inspections. The exact process varies by municipality, so the local building department and zoning office need to review the proposed use before construction begins.
Massachusetts uses the MA State Building Code, including 780 CMR, for requirements such as habitable-space height, egress, fire safety, and construction details. If the basement includes a sleeping room, the emergency escape opening must meet the dimensions described earlier. A bedroom isn't created legally just because a bed fits in the plan.
Height and zoning can change the project
A basement can also affect zoning classification. Massachusetts code treats a basement as a story above grade if the finished surface of the floor above is more than 6 feet above grade, more than 6 feet above finished ground level for more than 50% of the total perimeter, or more than 12 feet above finished ground level at any point, as described in 780 CMR building height and area provisions. That can affect zoning and building-code compliance, particularly when a homeowner proposes a separate entrance, apartment-style use, or ADU.
Aureli Construction coordinates the practical permit sequence with local building departments across Greater Boston:
- Review the intended use, existing conditions, zoning constraints, and proposed layout.
- Prepare the drawings and scope needed for the application.
- Submit the building permit and coordinate electrical or plumbing permits where applicable.
- Complete permitted framing, rough electrical, rough plumbing, and insulation work in the required order.
- Schedule rough inspections before walls and ceilings are closed.
- Complete finish work, test required systems, and schedule final inspections and closeout.
The Massachusetts basement egress window requirements should be reviewed before framing because enlarging a window opening after the wall is finished is disruptive and expensive. Smoke and carbon monoxide alarms, electrical circuits, stair details, insulation, and mechanical access also need to appear in the approved plan.
Prepare these documents early
Bring the property address, existing and proposed floor plans, room-use description, window dimensions, structural information if openings change, and a list of proposed electrical or plumbing additions. For separate-entry living space, ask the local zoning office whether a special permit, variance, or additional review applies. We never advise finishing first and applying later. Unpermitted work can create inspection, resale, insurance, and removal problems.
Decide Which Work to DIY and What to Hire Out
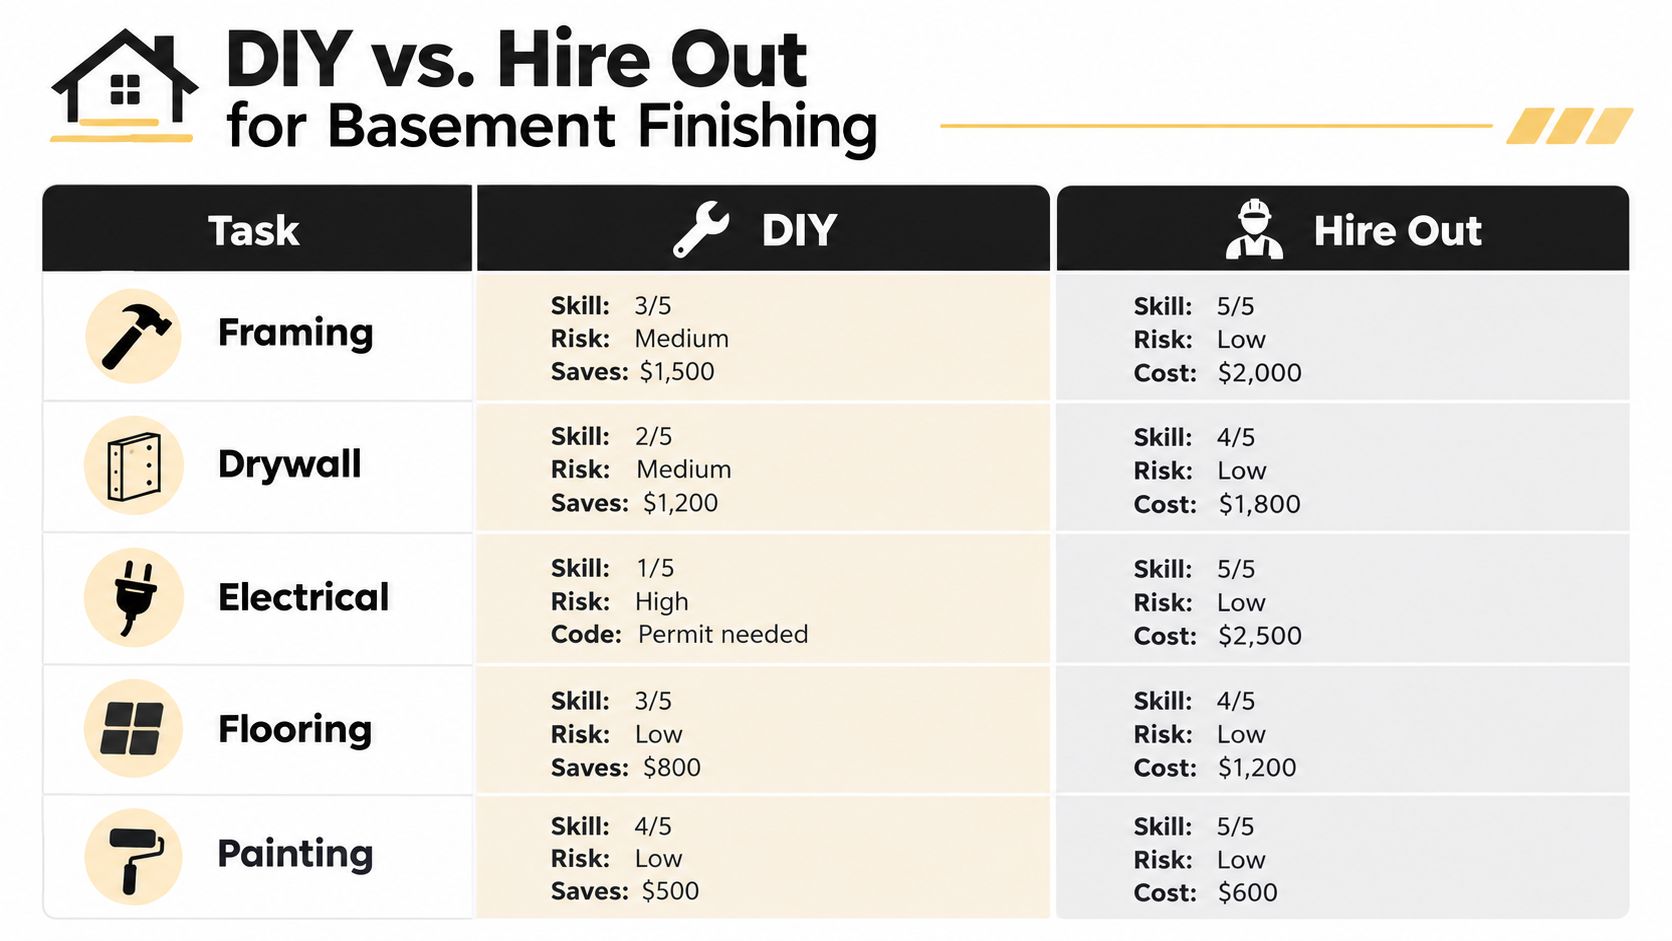
DIY can reduce labor, but basement work shouldn't be treated as entirely do-it-yourself or entirely contractor-only. Divide each task by skill, risk, code impact, and the consequence of failure.
Painting, basic demolition, simple trim installation, and a floating LVP floor over a properly prepared surface may suit an organized homeowner. These tasks take patience, but a mistake usually affects time and materials rather than the integrity of the finished wall assembly.
Keep these tasks with licensed professionals
- Moisture control: Drainage, vapor control, and foundation repairs are difficult to correct after framing.
- Egress work: Cutting masonry or foundation walls affects structure, drainage, window wells, and code compliance.
- Electrical rough-in: New circuits, panels, outlets, and lighting require proper permitting and inspection.
- Plumbing: Bathrooms, wet bars, and drain changes can require substantial coordination below the slab.
- Framing around utilities: Incorrect clearances can interfere with mechanical access and inspection approval.
If a failed task would send the project back to bare concrete, hire it out. If it only costs time and materials to redo, DIY may be reasonable.
Homeowners considering concrete preparation or repair can also find professional concrete upgrades when the work involves surface correction, drainage, or a finish that must remain stable. The cheapest labor choice isn't always the cheapest project choice if it delays inspections or forces another trade to remove completed work.
Finish Strong with Smart Design and Contractor Support
Once the basement is dry, code-ready, and deliberately scoped, design choices can make a modest finish feel generous. Keep sightlines open, place work areas near available daylight, use light-colored flooring, and plan recessed LED runs before the ceiling is closed. A drop ceiling can preserve service access, while carefully located storage keeps the room useful without filling every wall with built-ins.
The resale argument depends on what the finished area delivers. National resale data has historically suggested recovery of roughly 70% to 75% of basement-finishing costs, including a commonly cited example in which a $50,000 renovation added about $35,000 in resale value, as discussed in this basement finishing return-on-investment analysis. That doesn't guarantee an appraisal result in Cambridge, Somerville, Arlington, or any other town. Practical, code-compliant space generally makes a stronger value case than expensive features buyers may not use.
Our final checkpoints include permit closeout, rough and final inspection coordination, mechanical sign-offs, punch-list review, and a commissioning walkthrough. We show the homeowner how the dehumidifier, sump equipment, smoke and carbon monoxide detectors, shutoffs, and egress hardware operate. We also recommend a written change-order policy and one pre-construction walkthrough so decisions are documented before work starts.
Common questions from Greater Boston homeowners
How long does basement finishing take
The timeline depends on moisture work, permitting, egress, plumbing, electrical scope, and finish level. A simple finish moves differently from a project that includes a bathroom or bedroom. We provide a schedule after reviewing the existing basement and permit path.
Can I finish only part of the basement
Yes. A limited rec room, office, or flex area can preserve access to utilities and defer expensive features. We recommend separating finished living space from storage and mechanical areas rather than forcing the entire basement into the first phase.
Does a basement bedroom need an egress window
Yes, a sleeping room must have a compliant emergency escape and rescue opening. The opening dimensions and sill height need to be verified before construction, not after the room is framed.
Do I need permits for a finished basement
Building, electrical, and plumbing permits may apply depending on the work. Massachusetts code, local zoning, and municipal inspection requirements all matter, especially when the plan adds a bedroom, bathroom, separate entrance, or apartment-style use.
How are change orders handled
We recommend written descriptions of the added or deleted work, the price effect, and the schedule effect before the work proceeds. That keeps a budget project from drifting through verbal decisions made in the middle of construction.
Aureli Construction provides basement scope reviews, moisture-conscious planning, permit coordination, and construction for homeowners across Greater Boston, along with home additions, kitchen renovations, bathroom remodeling, and ADU construction. Visit Aureli Construction to request a free estimate and turn your basement plan into a buildable, code-conscious budget.