
In Medford, we still meet homeowners who finish a kitchen remodel and then realize the room feels wrong after dark. The cabinets look good, the counters are new, but the prep zone is shadowed, the island glares, and the only switch in the room does too much at once.
That's why lighting design for kitchens has to be treated like part of the build, not a last-minute fixture pick. A good plan balances visibility, comfort, and code, and it has to work in real Greater Boston houses, from triple-deckers in Somerville to colonials in Newton.
We approach it the same way we approach a kitchen remodel in Medford or Arlington, by looking at how the room gets used, what the electrical layout allows, and where permits and inspections come into play. If you're comparing contractors now, this guide will help you understand the layers, the placement rules, the brightness targets, and the Massachusetts details that separate a decent plan from one that works well. For broader project planning, our kitchen remodel tips are a useful starting point, and SouthRay's pro kitchen lighting design advice is worth a look if you want a second professional perspective.
Table of Contents
- Why Kitchen Lighting Trips Up Greater Boston Homeowners
- The Three Layers of Light Every Kitchen Needs
- Fixture Types and Placement Rules That Actually Work
- Brightness and Color Temperature Calculations You Can Run
- Massachusetts Code, Permits, and Inspection Realities
- Two Greater Boston Kitchen Layouts Compared
- Budget, Timeline, and Working with a Design-Build Contractor
- Questions Greater Boston Homeowners Ask Before Hiring
Why Kitchen Lighting Trips Up Greater Boston Homeowners
A lot of kitchen lighting problems start with the same assumption, that if the ceiling is bright, the room is finished. In older homes around Belmont, Cambridge, and Melrose, that usually leaves a kitchen that looks fine in daylight and becomes awkward at 7 p.m., when counters fall into shadow and the island starts throwing glare back at you.
The better way to judge the plan is performance at the work surface. A 2019 study of shared residential kitchens measured only 108 lux on vertical work surfaces, while horizontal work surfaces ranged from 300 to 538 lux, which shows why ceiling light by itself misses the actual job. That gap explains why modern kitchen planning relies on dedicated task lighting instead of one fixture in the middle of the room, as shown in a residential kitchen lighting study.
That same practical mindset shows up in professional guidance, which points to 300 lux for general kitchen lighting and 500 lux for task zones like worktops, sinks, and cooktops. In plain English, the room needs enough light to chop, clean, read labels, and avoid fighting shadows from your own body.
For homeowners comparing kitchen remodeling Medford options or sorting out custom kitchen Arlington layouts, that is the first decision to get right. The lighting plan has to match how the kitchen works, not just how it looks in a cabinet showroom. If you are planning a larger project, the sequencing in kitchen renovation matters because lighting should be coordinated with cabinets, electrical rough-in, and inspection timing before finishes get locked in.
Practical rule: If a kitchen only has one switch for the whole room, the plan is usually too simple for real life.
We see the same issue in Greater Boston projects and in the kind of pro kitchen lighting design advice that holds up once the sun goes down. Our team at Aureli Construction handles the lighting plan alongside the layout, which keeps the rough-in and the final finish from fighting each other later.
What homeowners usually miss
- The island isn't always one thing. In many homes, it handles prep, serving, and casual seating at different times of day.
- Natural light changes the plan. A bright day in Newton does not guarantee the kitchen will feel right at night.
- Fixture count is not the same as usable light. You can install plenty of bulbs and still leave the counters underlit.
- Placement matters as much as wattage. A poorly aimed fixture can create glare where you need visibility.
By the time the lighting plan is drawn correctly, the kitchen already feels more intentional on paper. That is the point. The room should work before the first fixture goes in, not after you have lived with the wrong layout for months.
The Three Layers of Light Every Kitchen Needs
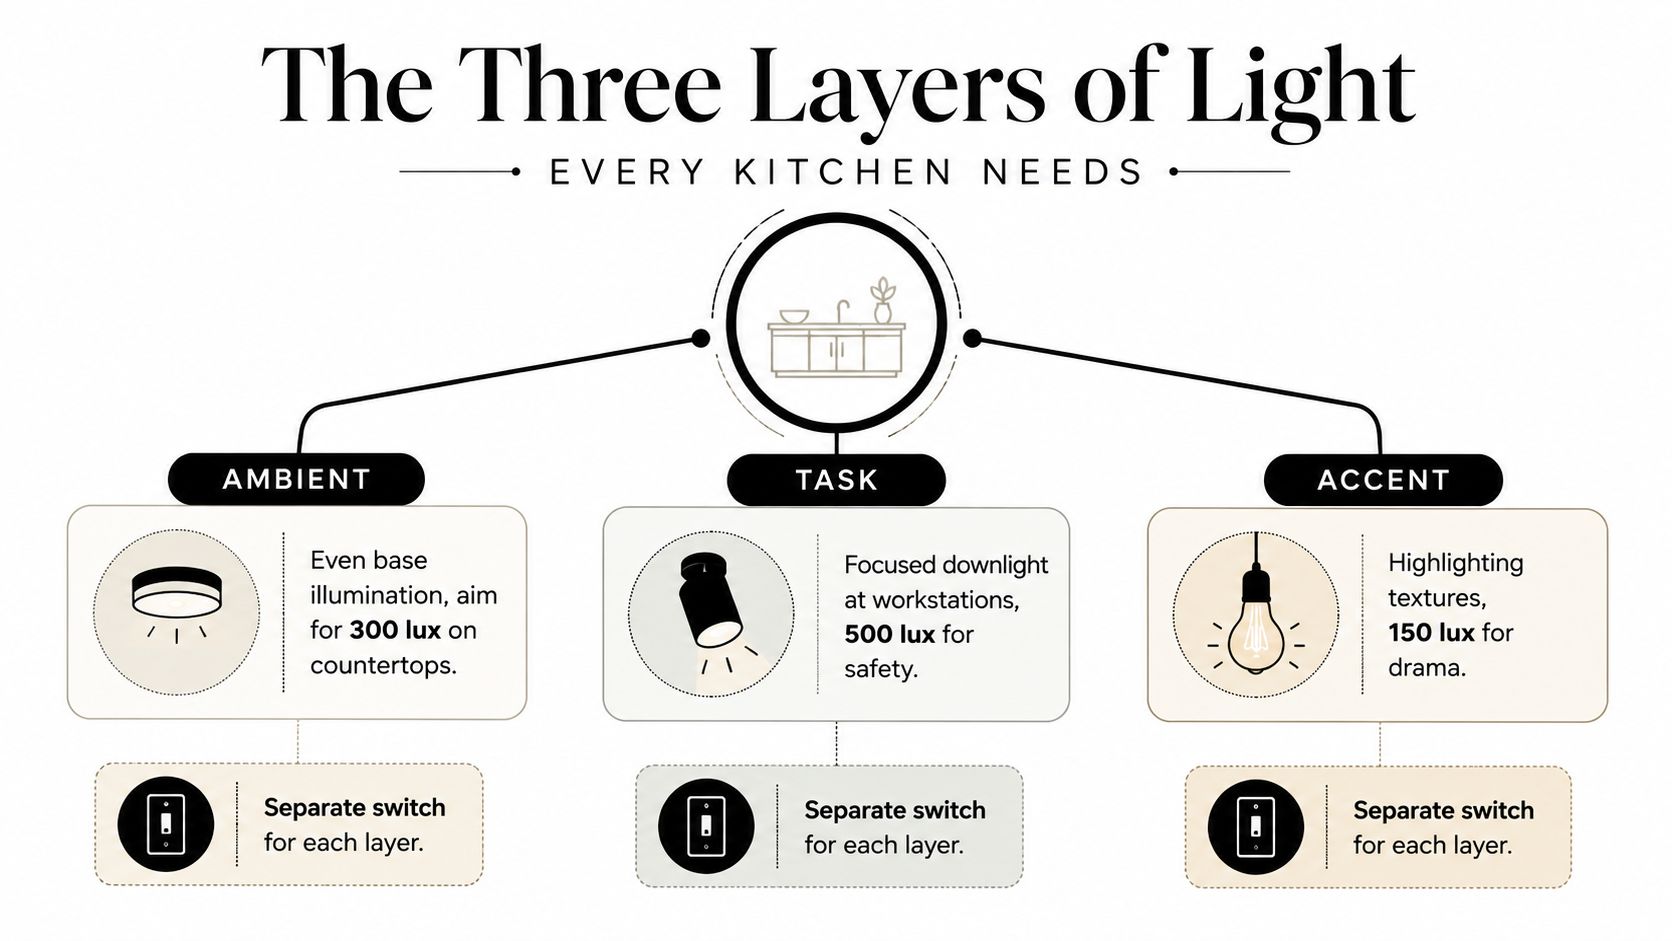
Kitchen lighting works best when the layers are separate, not mashed into one ceiling plan. Plumbing uses distinct pipes for supply, drain, and fixture, each serving a different job, and you would never ask one pipe to do all three.
Ambient lighting gives the room its base level of light. In practice, that's the ceiling-mounted or recessed layer that brings the room into the 300 lux range for general use source. It should make the kitchen feel even, not dramatic.
Task lighting is the workhorse. It's the light over counters, sinks, cooktops, and islands where food prep happens, and it needs to land closer to the 500 lux task target source. In a real kitchen, that usually means undercabinet strips, well-aimed pendants, or a combination of both.
Accent lighting is the layer homeowners often skip until the end. It highlights glass fronts, open shelves, tile, or a finished niche, and it's what keeps the kitchen from feeling flat after the practical lights are on. In a Newton or Somerville kitchen, that can be the difference between a room that just works and one that feels finished.
The important part is control. Each layer should be independently switched or dimmed so the room can shift from meal prep to homework to late-night cleanup. That's especially relevant in kitchen renovation work in Arlington and Somerville, where one room often has to cover more than one function.
We also pull in plumbing-minded thinking from bath kitchen upgrades because kitchens and baths have the same problem at the wall and ceiling level, they only work when the rough-in matches the finish plan.
Bottom line: ambient sets the base, task lights the work, accent finishes the room, and each layer needs its own control.
Fixture Types and Placement Rules That Actually Work
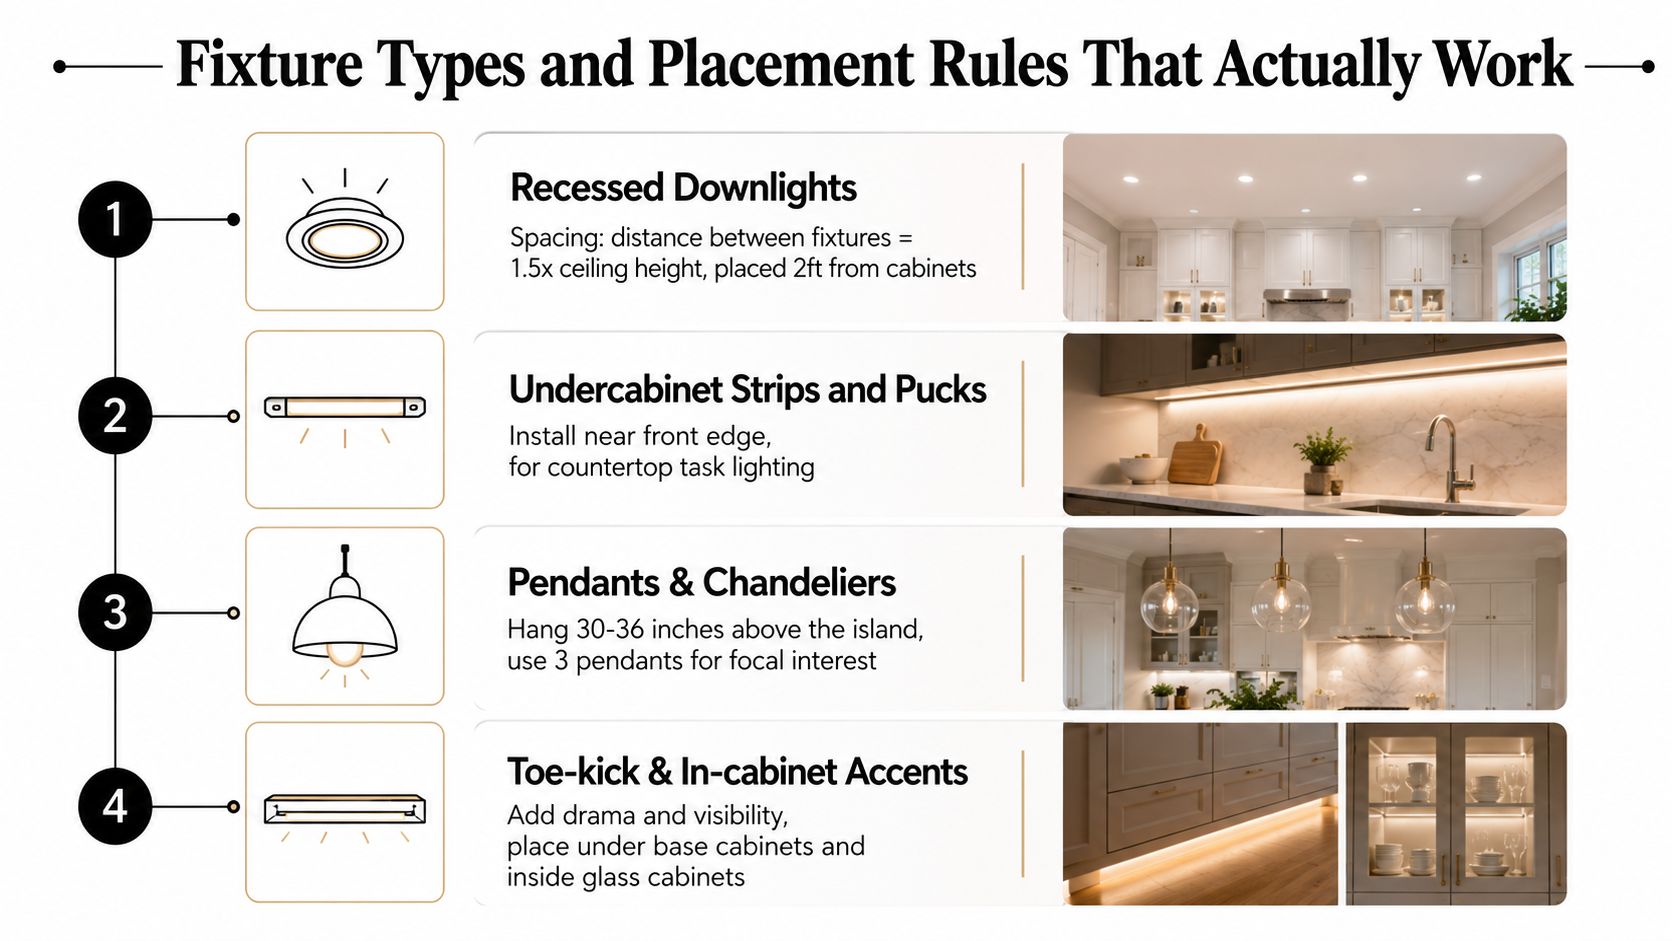
The fixture type matters, but placement matters more. We can make a nice fixture look bad if it's too close to the cabinets, too far apart, or hung over the wrong part of the island.
Recessed lights and undercabinet strips
For general ambient lighting, recessed fixtures usually work best with a 38 to 60 degree beam angle, while accent work often needs a tighter 25 degree beam source. That's the difference between broad coverage and a spotlight effect.
Spacing is where a lot of installs go sideways. FARO's guidance recommends recessed luminaires at a minimum 70 cm spacing to avoid hotspots and shadow bands source. In a kitchen with a lot of upper cabinets, undercabinet strips do the heavy lifting because they put light where the countertop is.
We usually set undercabinet fixtures near the front edge so the beam lands on the prep surface instead of washing the backsplash. That gives you cleaner knife work, less shadowing from your body, and better visibility when you're cleaning up.
Pendants, chandeliers, and islands
Pendants are useful, but they're not a magic fix. A common rule puts kitchen island pendants 30 to 36 inches above the island surface, with multiple pendants spaced about 30 to 32 inches apart source. That spacing helps the fixtures read as a set without crowding the visual field.
The tougher call is the mixed-use island. If the island is both a prep zone and a place to sit with coffee, separate control usually matters more than perfect symmetry. We'd rather see a well-aimed task pendant on one circuit and a dimmable decorative layer on another than force one pretty layout to do all the work.
For homeowners comparing custom kitchen Lexington or custom kitchen Belmont ideas, that distinction matters. A symmetrical pendant set can look clean, but if it throws glare onto the prep side or the seated side, it's the wrong solution.
Accent lights and cabinet detail
Toe-kick lights and in-cabinet strips do less for raw brightness and more for depth, orientation, and late-night usability. They're helpful when the room has dark corners or glass-front cabinetry that deserves to be noticed without overpowering the space. In a well-planned kitchen, they're the final layer, not the first thing we pick.
A good layout guide can help, but the field conditions in a real house always win. RBA's kitchen design guidance from RBA is useful because it ties lighting back to the actual plan, not just the fixture catalog.
Brightness and Color Temperature Calculations You Can Run
A homeowner does not need a lighting degree to pressure-test a plan. The useful split is simple. Lumens describe what the fixture puts out, while lux describes how much light lands on the counter, island, or sink where the work happens.
A quick Newton example
Take a 12 by 14 foot Newton kitchen. That gives you 168 square feet, and if the room is aiming for the common 300 lux level, the rough math shows why a single center fixture usually falls short. Convert the room area to square meters, multiply by the lux target, and the numbers make the gap obvious. kitchen lighting lumen calculator and lux guidance
The same guidance calls for a practical task-lighting band of 500 to 750 lux at the work surface, which is where undercabinet lighting earns its place. That does not mean piling on fixtures for the sake of it. It means the counters should feel bright enough when someone is chopping, reading a recipe, or cleaning up after dinner. Per the same guidance, that is the range where task lighting starts doing real work.
Color temperature and CRI
For ambient layers, 2700K to 3000K usually feels comfortable in a kitchen. For task zones, 4000K is a common choice when visibility matters more than warmth. We often split the difference in homes that need to feel calm at night but still read clearly at the cutting board.
CRI above 90 is worth asking for because color rendering matters in a kitchen. If you cannot read the true color of herbs, produce, and cooked food, the light may be bright, but it still is not doing its job. That same guidance also treats higher color rendering as part of getting the room to feel right, not just look bright.
Field check: If you can, use a lux meter app or a borrowed meter after trim-out. The drawing may look right, but the surface reading is what tells the truth.
That is why lighting decisions belong inside the remodel schedule, not after the cabinets arrive. The rough plan should be testable before drywall closes, and the finished room should be checked with real numbers, not only by eye.
Massachusetts Code, Permits, and Inspection Realities
Massachusetts jobs have their own rhythm, and kitchen lighting sits inside the 780 CMR Massachusetts State Building Code whether the fixture is decorative or not. The important thing for homeowners is knowing when a lighting change is a simple swap and when it becomes regulated work that needs permits and inspections.
Adding a new circuit, relocating switches, or running low-voltage undercabinet lighting through cabinets commonly triggers permit coordination. That's because the work touches the electrical system, not just the finish layer. In most Greater Boston towns, we pull those permits and schedule the inspections so the homeowner isn't left guessing at the counter.
What usually gets inspected
- Rough electrical inspection: This happens before drywall closes the ceiling or walls, while the wiring and boxes are still visible.
- Final inspection: This comes after trim-out, when the fixtures are installed and the room is ready to close.
- Protection near water: Guidance from Renovation Notes and Archlior points to IP44 as the minimum near sinks and within splash zones, with IP65 preferred where exposure is higher source.
Electrical protection matters too. In kitchen work, GFCI and AFCI expectations can affect how circuits are laid out, and box-fill calculations matter when recessed housings or transformer locations crowd the same cavity. Those details don't show up in a pretty rendering, but they absolutely show up on the job.
The safe move is to treat lighting as part of the permit set, not a late cosmetic change. That's where a design-build contractor helps, because the same team can coordinate the electrician, the cabinet schedule, and the inspection timing without the usual handoff mistakes.
For homeowners also weighing a home addition contractor Boston MA or a larger remodel path, that coordination matters even more. Lighting often gets decided in the same conversations as structure, ventilation, and cabinet layout, so the permit process needs to match the project, not fight it.
Two Greater Boston Kitchen Layouts Compared
A Cambridge triple-decker kitchen and a Newton open-concept kitchen call for different lighting decisions. The right plan starts with the footprint, the ceiling cavity, and how the room gets used.
In the Cambridge galley, ceiling space was tight and there was only one window at the back. We used low-profile recessed fixtures for ambient coverage, two layers of undercabinet light for the counters, and one decorative pendant at the dining end so the room felt finished without getting crowded. That is a familiar approach for a compact small-kitchen big possibilities layout, especially when the room needs to do a lot without much ceiling depth.
The Newton kitchen asked for a different mix. The island was long enough to serve as prep space, homework space, and the place where everyone gathered during dinner. That meant recessed ambient light, task pendants over the island, dedicated island task control, and toe-kick accent on separate dimmers, because one brightness level would have been wrong for at least two of those uses.
What changes the plan most: footprint, ceiling height, and whether the island is work space or social space.
For homeowners comparing Newton kitchen renovation examples with Woburn kitchen renovation examples, the lesson is simple. A custom layout beats a cookie-cutter pendant grid, because the best plan matches the room you live in, not the showroom image you saved on your phone.
Budget, Timeline, and Working with a Design-Build Contractor
A kitchen lighting budget in Greater Boston changes fast once the scope moves beyond a simple fixture swap. A few new recessed lights, dimmers, and a couple of undercabinet runs can stay relatively contained. Once the plan requires new wiring paths, ceiling repairs, or coordination with cabinets and inspections, the numbers move up for reasons homeowners can see on the job site.
| Scope | Typical Greater Boston Range | What Drives the Number |
|---|---|---|
| Lighting-only upgrade | modest to mid-range local project pricing | Fixture count, wiring changes, dimmers, permit scope |
| Partial kitchen renovation with lighting | mid-range Greater Boston pricing | Cabinet adjustments, electrical rough-in, patching |
| Full kitchen renovation with layered lighting | higher Greater Boston pricing | Layout changes, cabinet lead times, inspection coordination |
That table is useful because it shows where the money goes. A lighting-only update is mostly about fixture count and the amount of existing wiring that can stay in place. A partial renovation adds cabinet work and wall repair. A full renovation brings in more coordination, more trade sequencing, and more places for a bad lighting decision to create extra labor.
The schedule follows the same logic. Lighting decisions need to be set before cabinet orders, because undercabinet placement, transformer locations, and switch positions all depend on the final layout. Electrical rough-in happens after framing and before drywall, then trim-out comes after painting and countertop templating. If one of those steps gets pushed out of order, the project slows down while the trades wait on one another.
Design-build helps keep that chain intact. A contractor handling the kitchen, the electrical plan, and the permit process in one place can keep fixture placement tied to field conditions instead of to a sketch that changes after demolition. In homes across Wellesley and Winchester, that kind of coordination avoids the late-stage changes that happen when cabinets, electrical, and layout decisions are split between separate vendors.
For homeowners comparing kitchen renovation examples with their own layout, the value is in seeing how lighting choices follow the room. A contractor who works from the cabinet plan, the inspection requirements, and the actual ceiling conditions can give you a schedule that holds up once the walls open, which matters more than a pretty fixture list on paper.
Aureli Construction is one local option for that kind of coordinated kitchen planning in Greater Boston. It keeps the lighting plan, cabinet layout, and field work moving together, which is what a remodel needs when the room has to function the day the job ends.
Questions Greater Boston Homeowners Ask Before Hiring
Can we stay in the house during a kitchen lighting remodel
Usually, yes, if the project is limited and the crew can isolate the work area. Once the kitchen becomes the main traffic path or the electrical shutoff affects too much of the house, the disruption gets harder to manage.
When should lighting be decided relative to cabinets
Before cabinet orders. The exact locations for undercabinet lights, pendants, and switches affect millwork, wiring, and inspection timing, so locking the plan late is where avoidable change orders start.
Do smart dimmers and scene controls actually help
They can, if the kitchen has multiple uses. A room that shifts from cooking to homework to entertaining benefits from separate control more than a single fixed brightness level.
What should I confirm before I sign a contract
Ask which layers are included, where each fixture goes, who handles permits, and how the electrician coordinates with the cabinet schedule. If the answer is vague, the plan probably isn't finished yet.
What happens if a fixture is back-ordered
The contractor should identify an approved alternate before trim-out, not after. That's one of the main reasons we like fixture selections made early, it gives the project room to absorb supply delays without stalling the whole kitchen.
If you're planning a kitchen remodel in Greater Boston and want the lighting drawn around how the room will be used, we can help. Aureli Construction handles design, permits, and construction together, so the lighting plan, cabinet layout, and electrical rough-in stay aligned from the first estimate through final inspection.